🙋♂️ 客户 / 终端用户预算
跟踪花费,为客户设置预算。
跟踪客户花费
1. 使用客户 ID 进行 LLM API 调用
发起一个 /chat/completions 调用,传入 'user' - 首次调用成功
curl -X POST 'http://0.0.0.0:4000/chat/completions' \
        --header 'Content-Type: application/json' \
        --header 'Authorization: Bearer sk-1234' \ # 👈 YOUR PROXY KEY
        --data ' {
        "model": "azure-gpt-3.5",
        "user": "ishaan3", # 👈 CUSTOMER ID
        "messages": [
            {
            "role": "user",
            "content": "what time is it"
            }
        ]
        }'
customer_id 将与新的花费一起被插入或更新到数据库中。
如果 customer_id 已存在,花费将累加。
2. 获取客户花费
- 总花费
- 事件 Webhook
调用 /customer/info 以获取客户的总花费
curl -X GET 'http://0.0.0.0:4000/customer/info?end_user_id=ishaan3' \ # 👈 CUSTOMER ID
        -H 'Authorization: Bearer sk-1234' \ # 👈 YOUR PROXY KEY
预期响应
{
    "user_id": "ishaan3",
    "blocked": false,
    "alias": null,
    "spend": 0.001413,
    "allowed_model_region": null,
    "default_model": null,
    "litellm_budget_table": null
}
要更新客户端数据库中的花费,将代理指向您的 webhook。
例如,如果您的服务器是 https://webhook.site 并且您监听的是 6ab090e8-c55f-4a23-b075-3209f5c57906
- 将 webhook URL 添加到您的代理环境中
export WEBHOOK_URL="https://webhook.site/6ab090e8-c55f-4a23-b075-3209f5c57906"
- 将 'webhook' 添加到 config.yaml 中
general_settings:
  alerting: ["webhook"] # 👈 KEY CHANGE
- 测试一下!
curl -X POST 'https://:4000/chat/completions' \
-H 'Content-Type: application/json' \
-H 'Authorization: Bearer sk-1234' \
-D '{
    "model": "mistral",
    "messages": [
        {
        "role": "user",
        "content": "What's the weather like in Boston today?"
        }
    ],
    "user": "krrish12"
}
'
预期响应
{
  "spend": 0.0011120000000000001, # 👈 SPEND
  "max_budget": null,
  "token": "88dc28d0f030c55ed4ab77ed8faf098196cb1c05df778539800c9f1243fe6b4b",
  "customer_id": "krrish12",  # 👈 CUSTOMER ID
  "user_id": null,
  "team_id": null,
  "user_email": null,
  "key_alias": null,
  "projected_exceeded_date": null,
  "projected_spend": null,
  "event": "spend_tracked",
  "event_group": "customer",
  "event_message": "Customer spend tracked. Customer=krrish12, spend=0.0011120000000000001"
}
设置客户预算
在 LiteLLM 代理上设置客户预算(例如,月度预算,tpm/rpm 限制)
快速开始
创建 / 更新带有预算的客户
创建带有预算的新客户
curl -X POST 'http://0.0.0.0:4000/customer/new'
    -H 'Authorization: Bearer sk-1234'
    -H 'Content-Type: application/json'
    -D '{
        "user_id" : "my-customer-id",
        "max_budget": "0", # 👈 CAN BE FLOAT
    }'
测试一下!
curl -X POST 'https://:4000/chat/completions' \
-H 'Content-Type: application/json' \
-H 'Authorization: Bearer sk-1234' \
-D '{
    "model": "mistral",
    "messages": [
        {
        "role": "user",
        "content": "What'\''s the weather like in Boston today?"
        }
    ],
    "user": "ishaan-jaff-48"
}
分配定价等级
创建定价等级并将客户分配到其中。
1. 创建预算
- 界面
- API
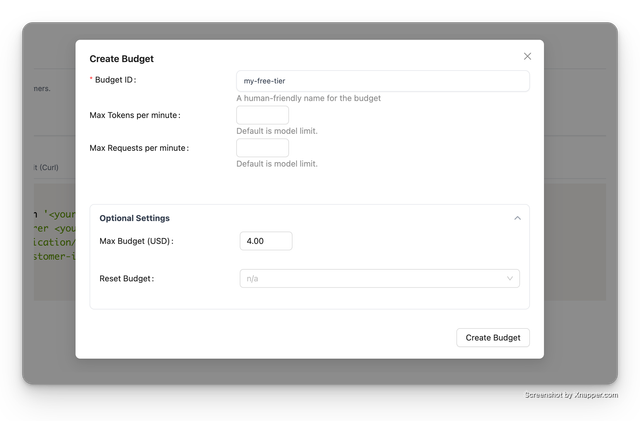
- 前往界面上的 'Budgets' 选项卡。
- 点击 '+ Create Budget'。
- 创建您的定价等级(例如,名为 'my-free-tier',预算为 $4)。这意味着此定价等级下的每位用户将拥有最高 $4 的预算。
使用 /budget/new 端点创建新预算。 API 参考
curl -X POST 'https://:4000/budget/new' \
-H 'Content-Type: application/json' \
-H 'Authorization: Bearer sk-1234' \
-D '{
    "budget_id": "my-free-tier",
    "max_budget": 4
}
2. 分配预算给客户
在您的应用程序代码中,创建新客户时分配预算。
只需使用创建预算时使用的 budget_id。在我们的示例中,这是 my-free-tier。
curl -X POST 'https://:4000/customer/new' \
-H 'Content-Type: application/json' \
-H 'Authorization: Bearer sk-1234' \
-D '{
    "user_id": "my-customer-id",
    "budget_id": "my-free-tier" # 👈 KEY CHANGE
}
3. 测试一下!
- curl
- OpenAI
curl -X POST 'https://:4000/customer/new' \
-H 'Content-Type: application/json' \
-H 'Authorization: Bearer sk-1234' \
-D '{
    "user_id": "my-customer-id",
    "budget_id": "my-free-tier" # 👈 KEY CHANGE
}
from openai import OpenAI
client = OpenAI(
  base_url="<your_proxy_base_url>",
  api_key="<your_proxy_key>"
)

completion = client.chat.completions.create(
  model="gpt-3.5-turbo",
  messages=[
    {"role": "system", "content": "You are a helpful assistant."},
    {"role": "user", "content": "Hello!"}
  ],
  user="my-customer-id"
)

print(completion.choices[0].message)